Step 1 - Login to your Let’s Calendar account and navigate to Settings -> SMTP Config
Step 2 - Select “Hotmail” under Mailing service and set it up with following details -
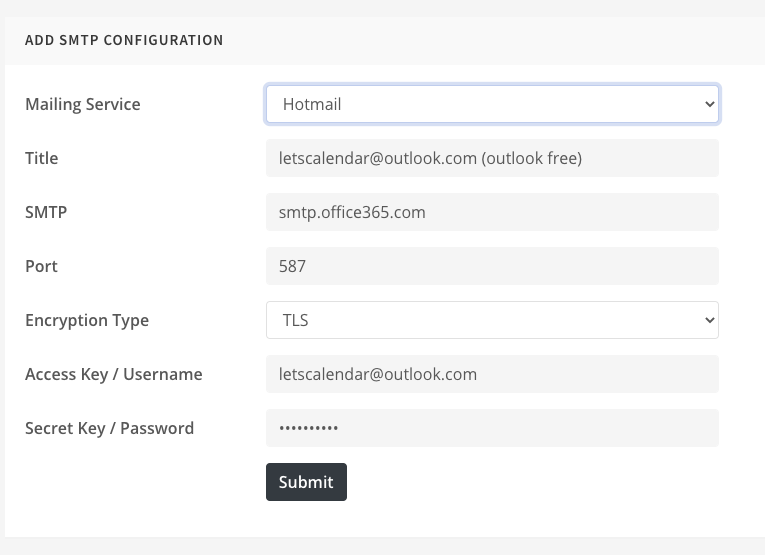
Step 3 - Title – Give a friendly title typically your domain / sending name related so you can identify easily e.g. letscalendar@outlook.com (outlook free)
Step 4 - Now rest settings we need to enter as per what we copied over from Outlook's SMTP Settings -
a. SMTP – this should be pre-filled as smtp.office365.com, if not enter the same or enter the info that was displayed to you by Outlook Settings
b. Port – 587 (OR as displayed to you by Outlook)
c. Encryption Type – TSL (Note: Outlook shows STARTSL, however in our test TSL works instead of STARTTSL, you can try either settings)
d. Access key / Username – Your free outlook.com email id or hotmail.com email id (e.g. letscalendar@outlook.com)
e. Secret Key / Password – This should be same as the password you use to sign-in to your outlook.com account (Free email)
f. Click on “Submit” - You should get a message SMTP Config Created Successfully!
Step 5 - Now navigate to “Settings” and “Domain Email” to now configure your “Sending identity”
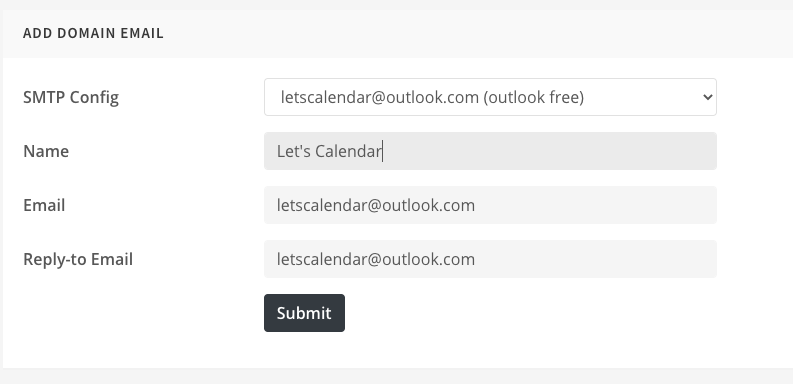
Step 6 - Under SMTP config drop down, select the SMTP you just now configured.
Step 7 - Enter the “Senders Name”, this should be same as what you want your users to see when they receive calendar invite's from you.
Step 8 - Next, Enter Sender Email ID and Reply-to Email id – this must be same as your free outlook.com or hotmail.com email account email id.
Step 9 - Click “Submit” and you should get a message “Domain Email Created Successfully.”
Step 10 - You have successfully configured your SMTP settings with Outlook (Free) / Hotmail.com next would be to test out the configuration by sending a test calendar invite.